
1. Create Shipment
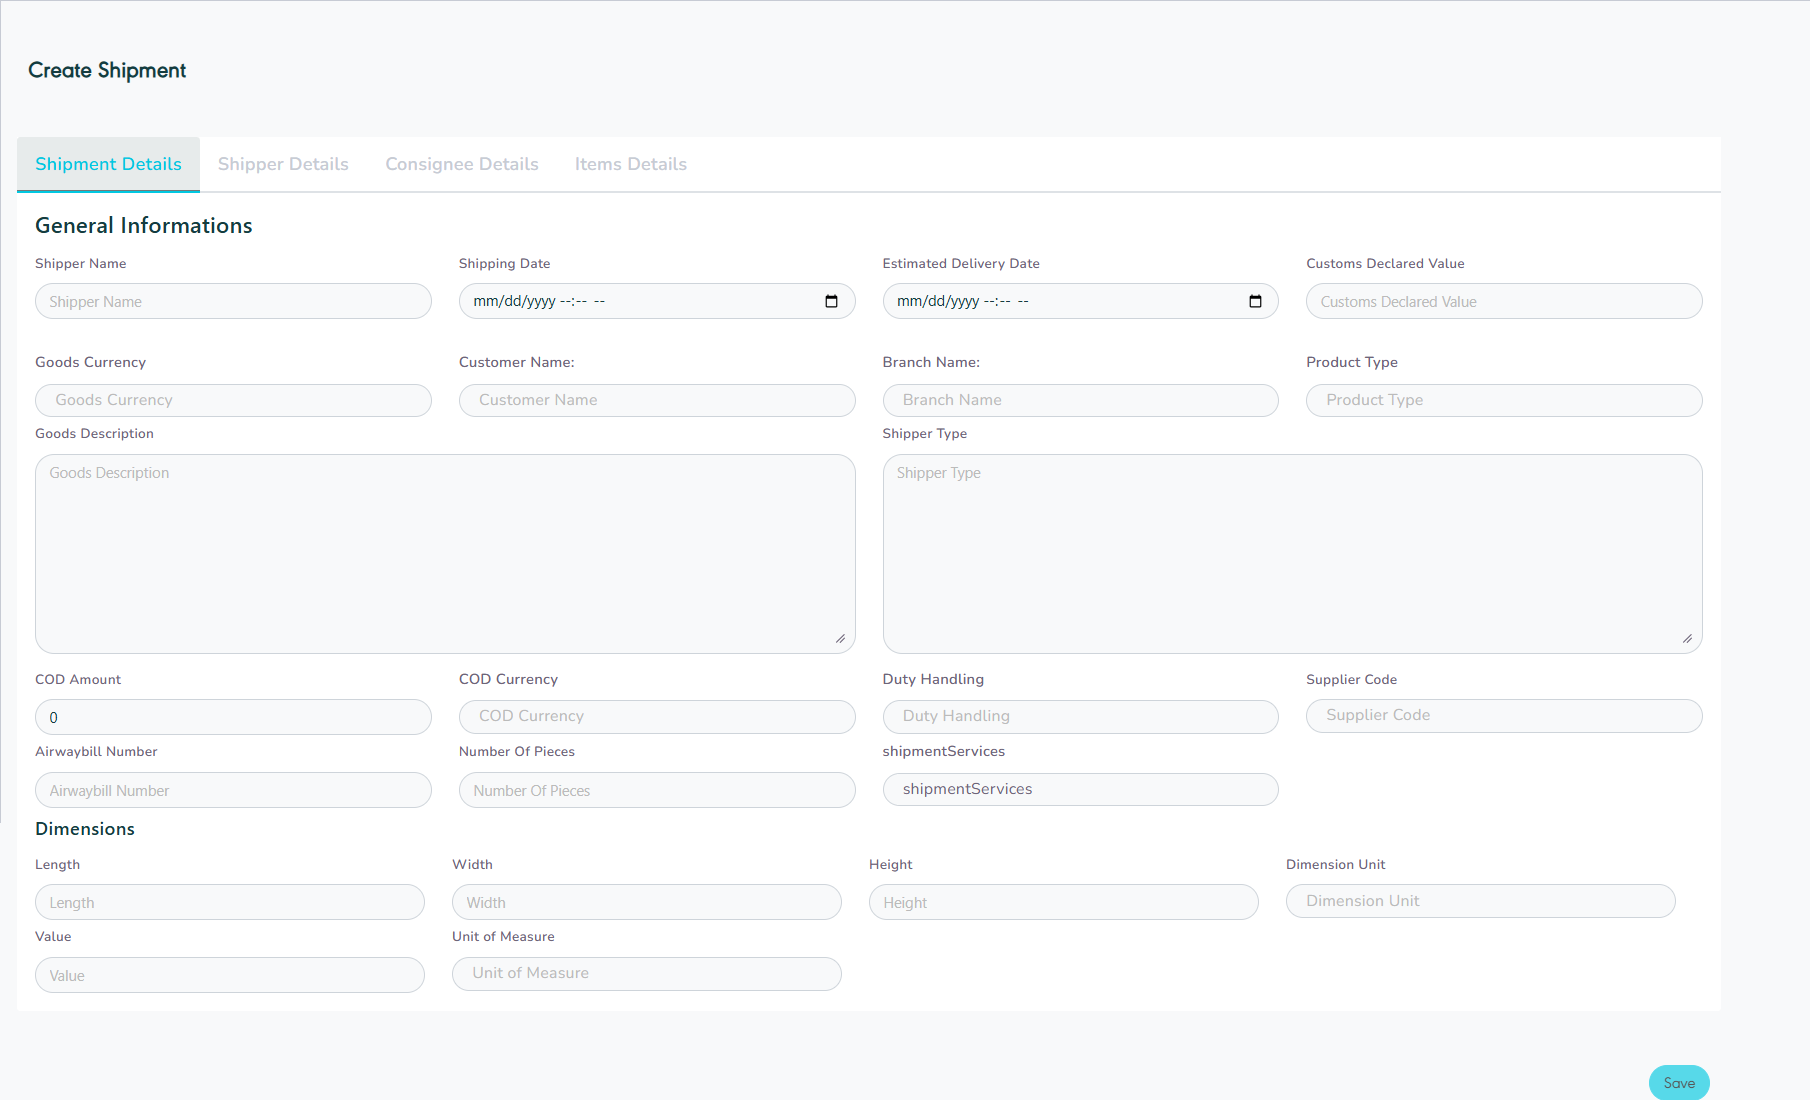
The user can add a new shipment by navigating to the ‘Shipment’ screen via the Hub Ops Module and clicking on Create Shipment as follows:
-
Shipper Name: this field represents the shipper’s name.
-
Shipping Date: this field represents the date and time the order was shipped from the origin to the destination.
-
Estimated delivery date: this field represents the date a shipment is expected to be delivered to the end user.
-
Product Type: this field represents the delivery service type e.g., Home Delivery, Office Delivery, Drop Off, etc.
-
Customs Declared Value: this field represents the shipment value to be declared to custom authorities.
-
Goods Currency: this field represents the currency of the goods amount value.
-
Customer Name: this field represents the customer’s name related to the shipment.
-
Branch Name: this field represents the branch name related to the shipment.
-
Goods Description: this field represents a detailed description of the shipped goods.
-
Shipper Type: this field represents the shipment type or the sender category for operational processing and billing purposes.
-
COD Amount: this field represents the amount to be collected on delivery from the consignee.
-
COD Currency: this field represents the currency of the COD amount value.
-
Duty Handling: this field represents the customs handling charge (Delivery Duty Paid / Unpaid).
-
Supplier Code: this field represents the special code for the supplier.
-
Airwaybill Number: this field represents the unique number of shipments.
-
Number of Pieces: this field represents the number of items within the shipment.
-
Shipment Services: this field represents the shipping service level or any additional services required for the shipment, such as Weekend Delivery, Cash on Delivery (COD), Insurance, etc.
-
Length: this field represents the shipment’s length.
-
Width: this field represents the shipment’s width.
-
Height: this field represents the shipment’s height.
-
Dimension Unit: this field represents the unit for shipment (CM: centimeter, M: Meter)
-
Value: this field represents the goods value.
-
Unit of Measure: this field represents the unit used to quantify the size of the goods being shipped in kilograms (KG) or pounds (LB).
-
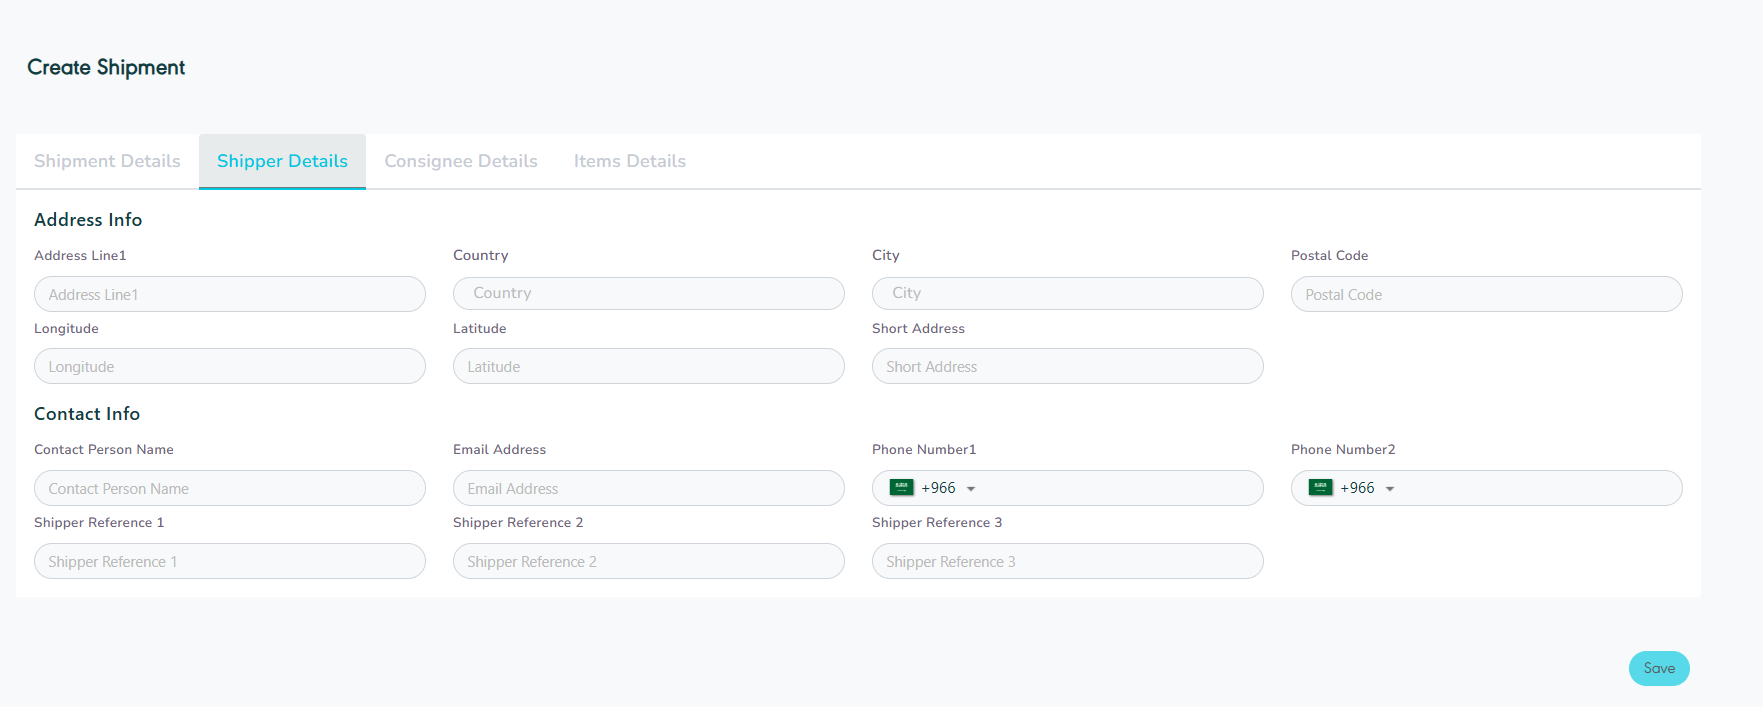
Shipper Details
-
Address line (1): this field represents the shipper’s address.
-
Country: this field represents the shipper’s country.
-
City: this field represents the shipper’s city.
-
Postal Code: this field represents a series of letters and numbers appended to the postal address to sort and classify mail.
-
Longitude: this field represents the address longitude to locate a location.
-
Latitude: this field represents the address latitude to locate a location.
-
Short Address: this field represents the shipper’s short address
-
Contact Person Name: this field represents the consignee’s name.
-
Email Address: this field represents the shipper’s email address.
-
Phone Number (1): this field represents the shipper’s main phone number.
-
Phone Number (2): this field represents the shipper’s secondary phone number.
-
Shipper Reference (1): this field represents any reference number or text added by the shipper.
-
Shipper Reference (2): this field represents any reference number or text added by the shipper.
-
Shipper Reference (3): this field represents any reference number or text added by the shipper.
-
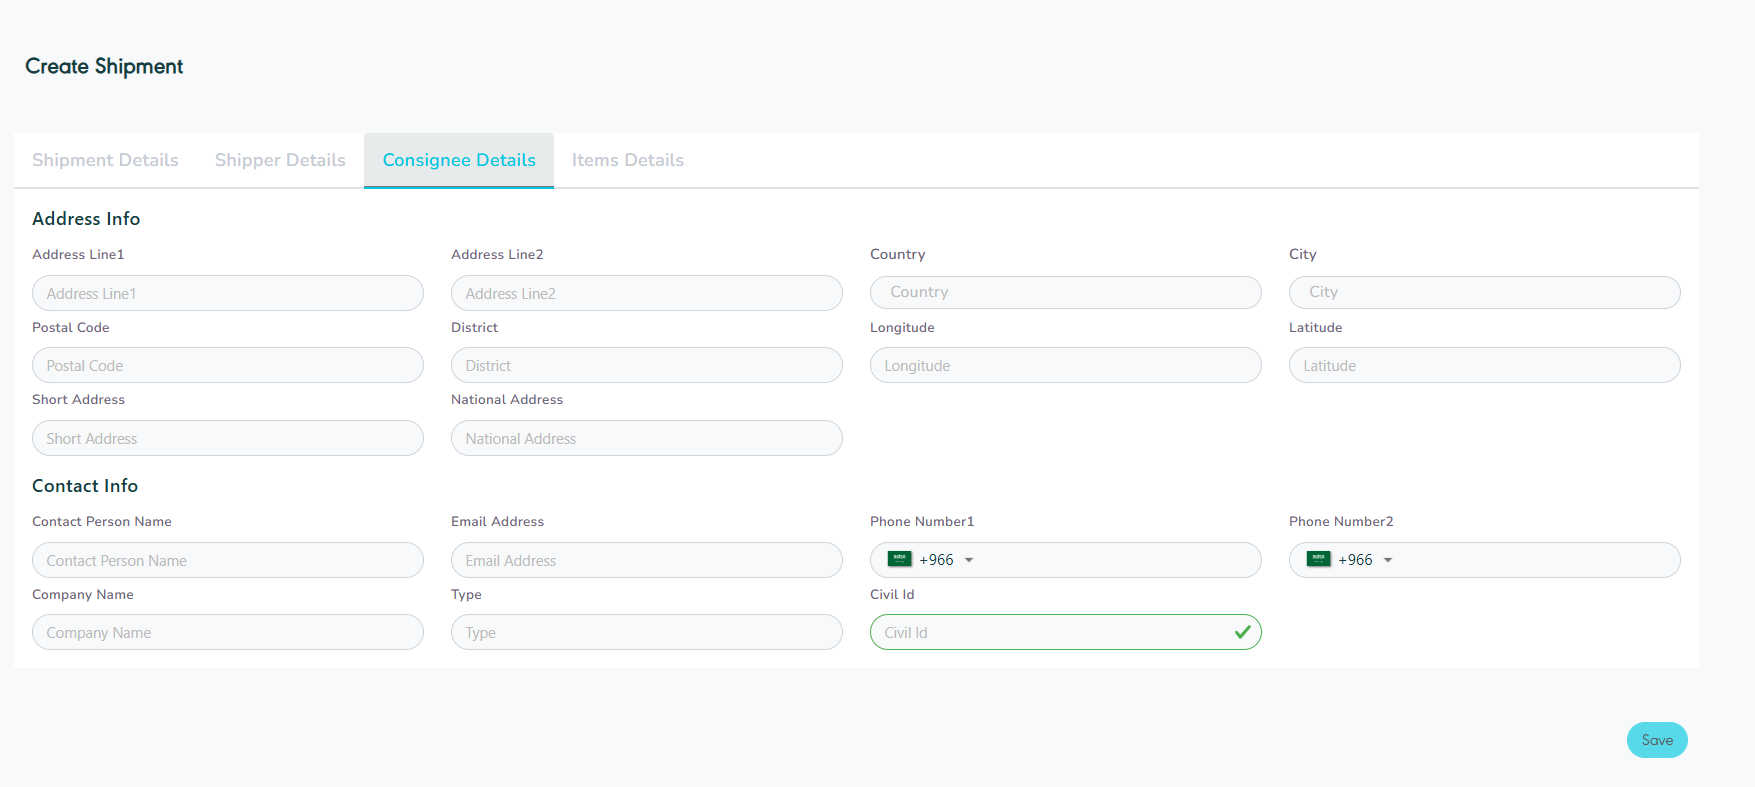
Consignee Details
-
Address Line (1): this field represents the consignee’s main address.
-
Address Line (2): this field represents the consignee’s secondary address.
-
Country: this field represents the consignee’s country.
-
City: this field represents the consignee’s city.
-
Postal Post: this field represents a series of letters and numbers appended to the postal address to sort and classify mail.
-
District: this field represents a location, area, or region linked to the address provided.
-
Longitude: this field represents the address longitude to locate a location.
-
Latitude: this field represents the address latitude to locate a location.
-
Short Address: this field represents the consignee’s short address.
-
Contact person Name: this field represents the consignee’s name bound to receive the shipment.
-
Email Address: this field represents the consignee’s email address.
-
Phone Number (1): this field represents the consignee’s main phone number.
-
Phone Number (2): this field represents the consignee’s secondary phone number.
-
Company Name: this field represents the company name of the consignee.
-
Type: this field represents the address type e.g., Residential, Industrial, or office location.
-
Civil Id: this field represents the consignee’s national id number.
-
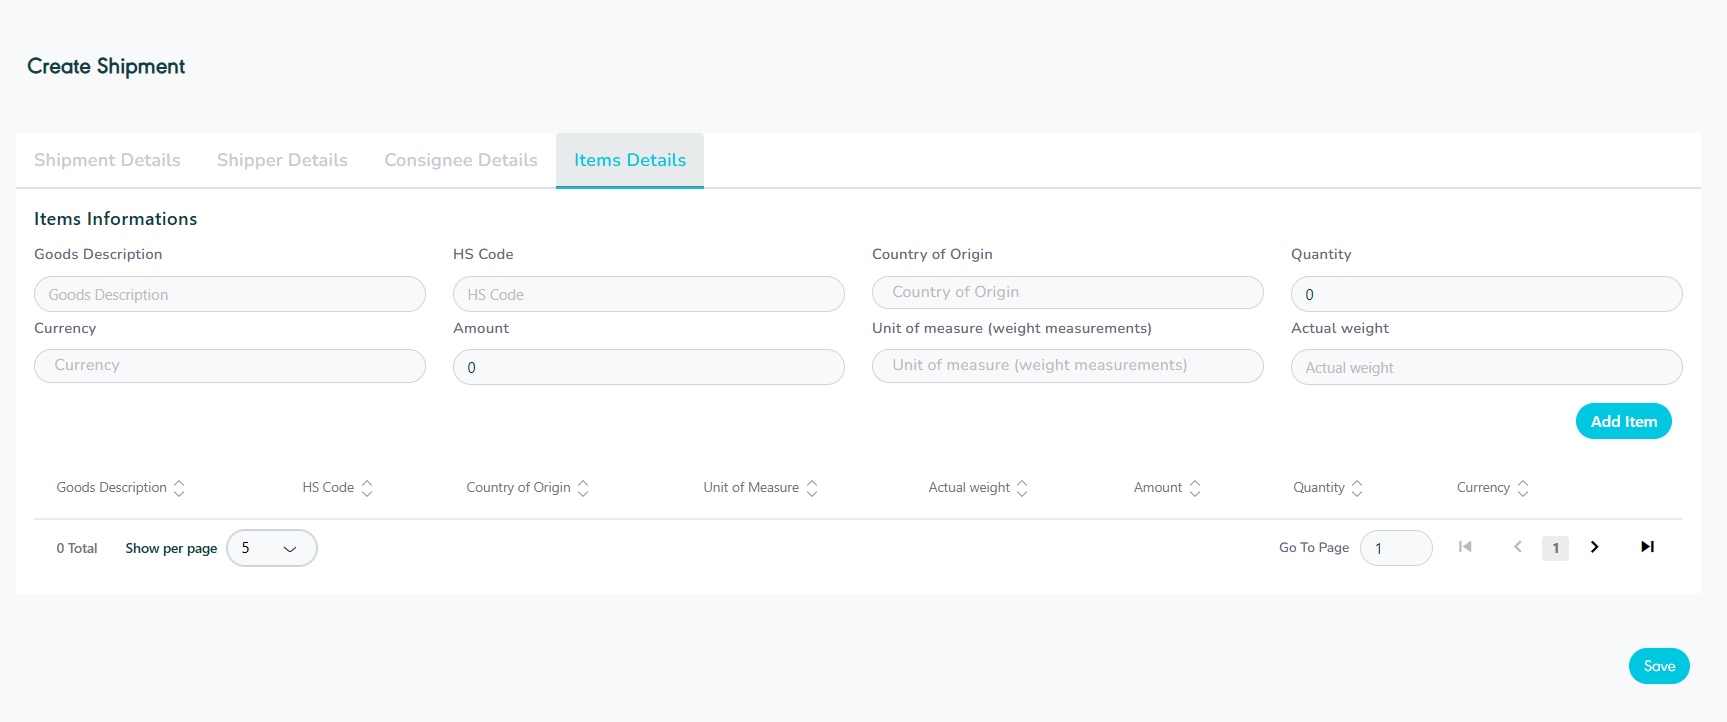
Items Details
-
Goods Description: this field represents the item’s general description.
-
HS Code: this field represents the stands for Harmonized System Code, and it is an internationally standardized system of names and numbers used to classify traded products.
-
Country of Origin: this field represents the item’s country of origin.
-
Quantity: this field represents the item’s quantity.
-
Currency: this field represents the currency of the item amount.
-
Amount: this field represents the item’s amount.
-
Unit of Measure: : this field represents the unit used to quantify the size of the goods being shipped in kilograms (KG) or pounds (LB).
-
Actual Weight: this field represents the item’s actual weight value.
By clicking on Add item, the added item moves to the items list section.
By clicking on Save, the system adds an added item to the shipment successfully.
1.1 Edit Shipment
The user can edit the shipment information by clicking on Edit from Actions by navigating to the ‘Shipment’ screen via the Hub Ops Module as follows:
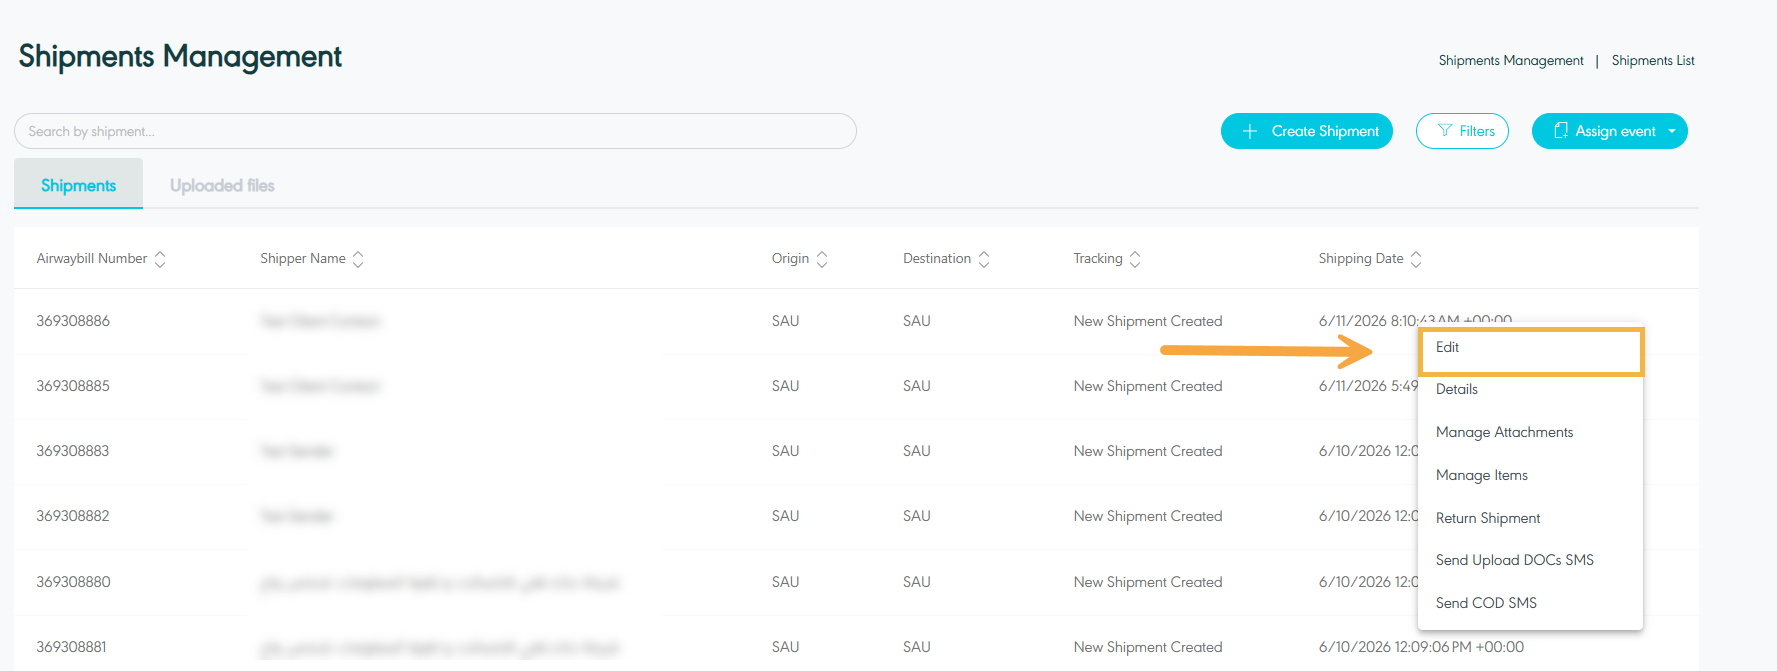
-
Edit Shipment Details
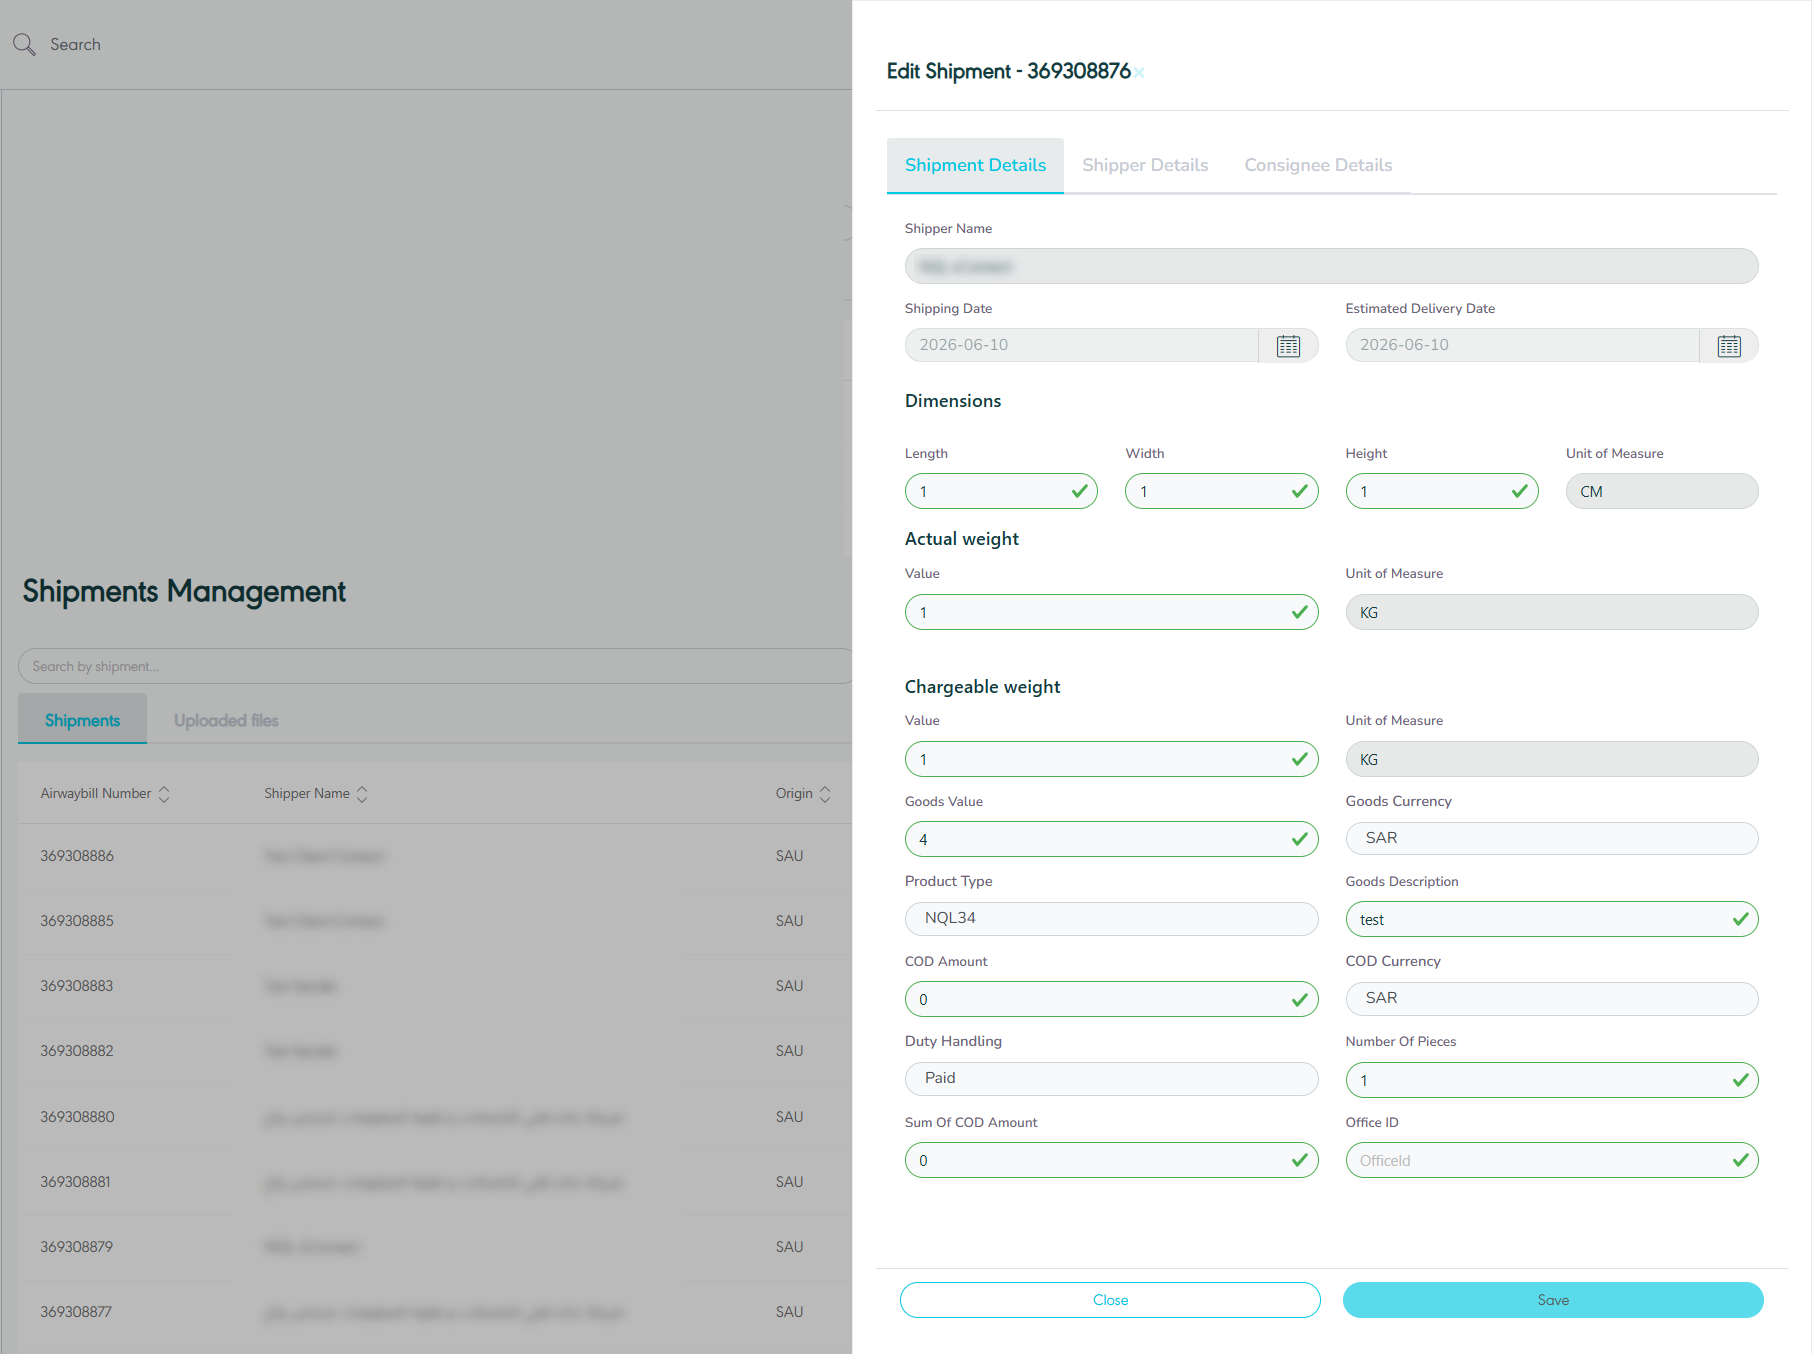
By clicking on Save, the system updates the information under the respective shipment successfully.
-
Edit Shipper Details
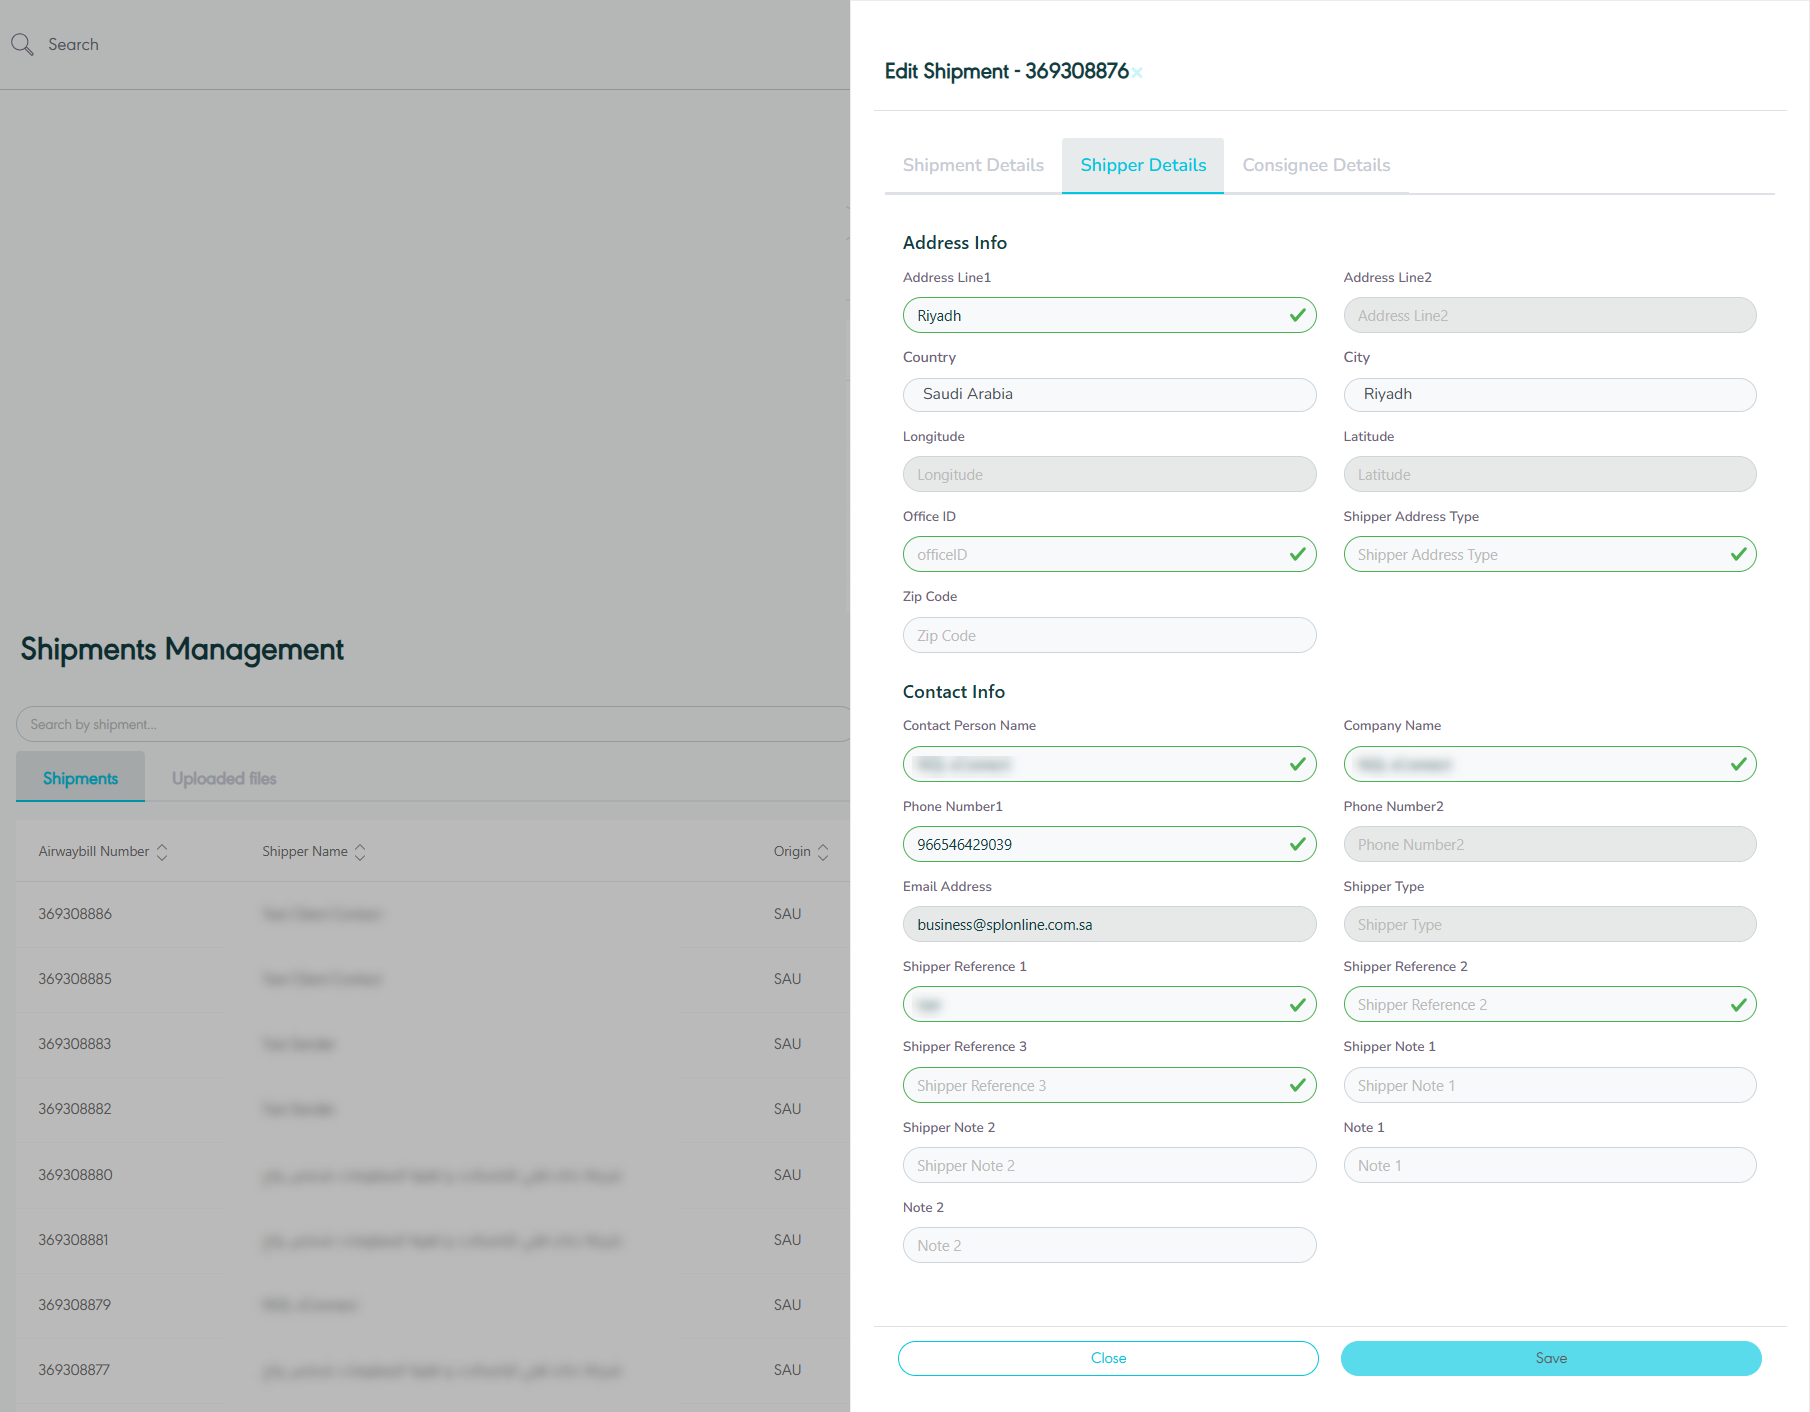
-
Edit Consignee Details
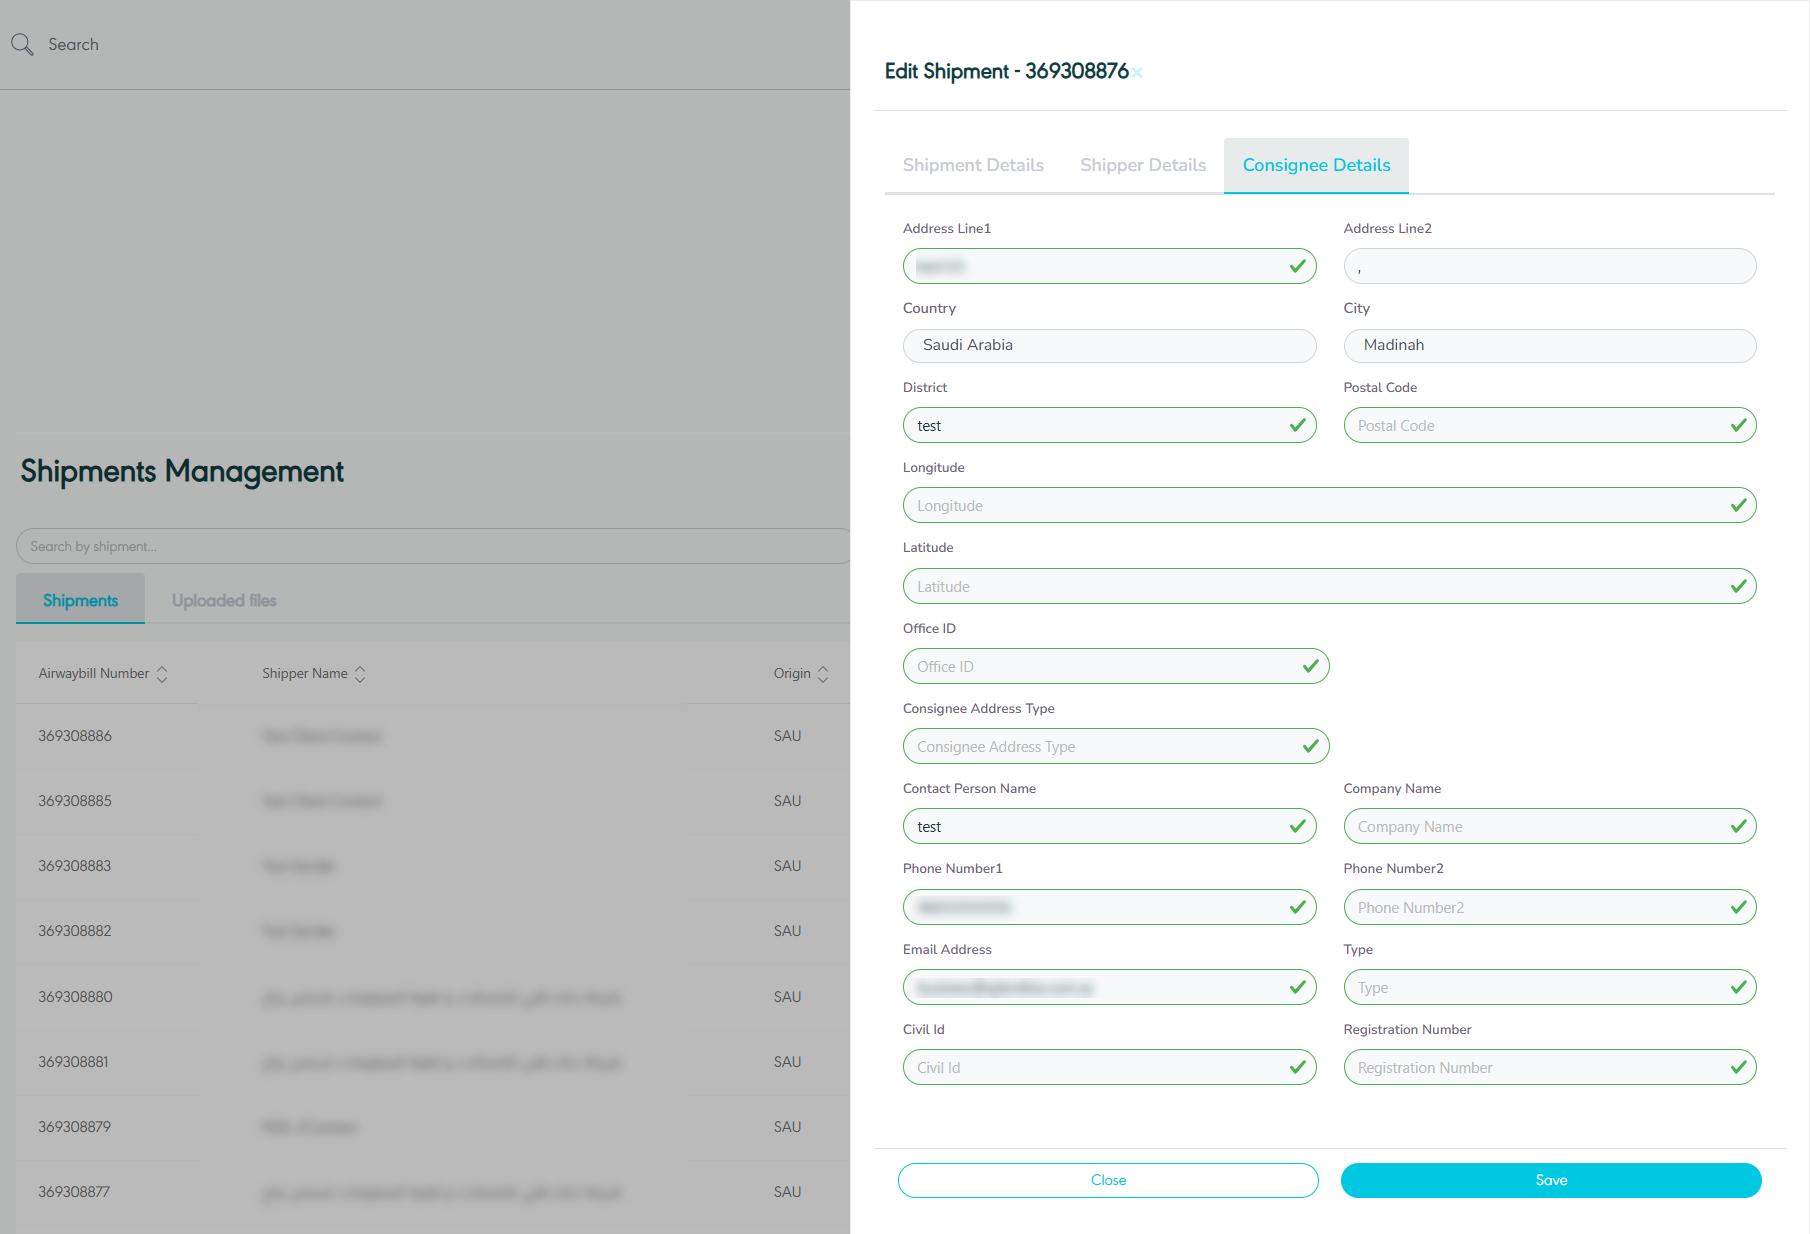
By clicking on Save, the system updates the consignee’s information successfully.
2. Bulk Upload Shipment
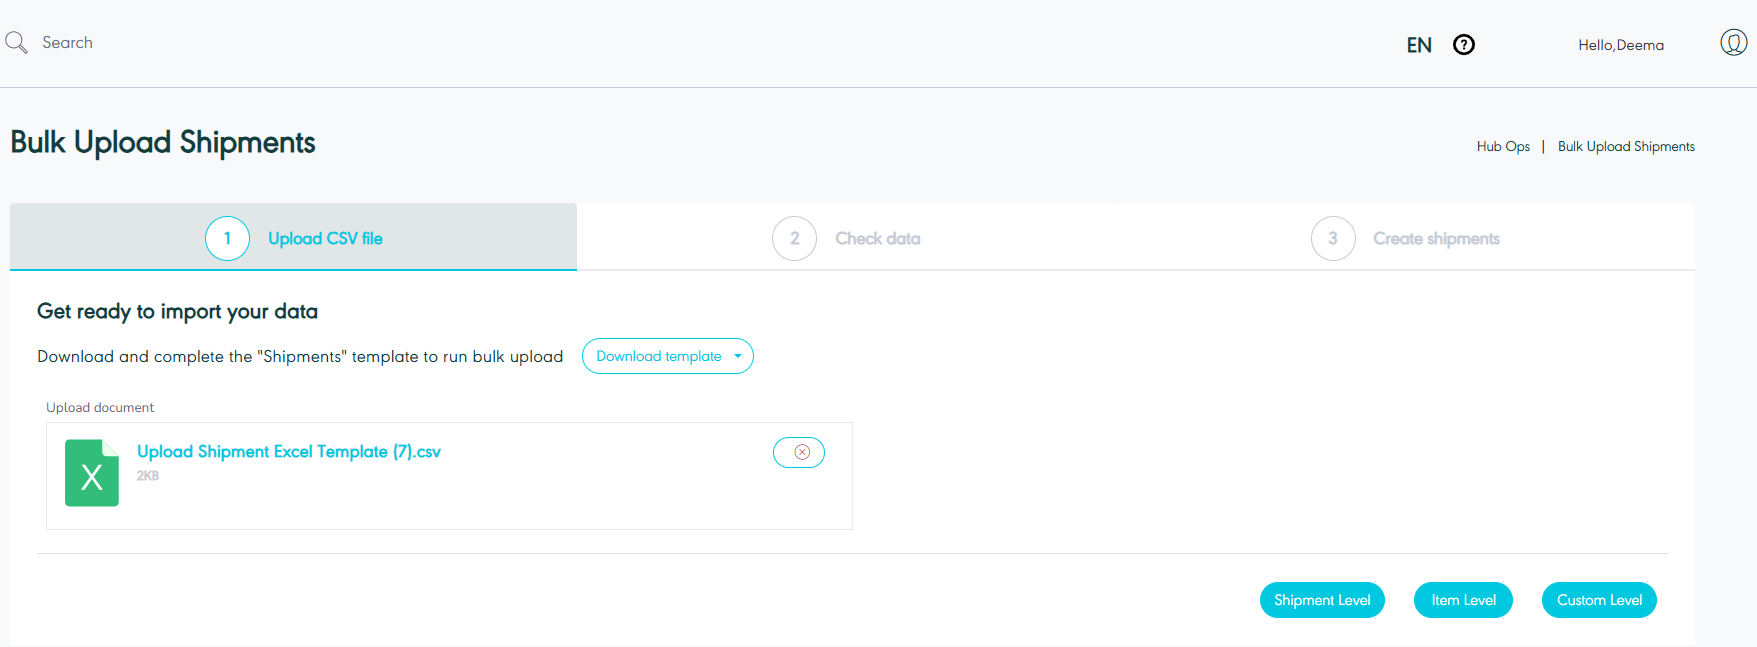
The user can view and upload bulk shipments by filling in the shipment template by navigating to the ‘Bulk Upload Shipment’ screen via the Hub Ops Module as follows:
-
Download template: the user can download the Excel template to upload the bulk.
-
Shipment Level: The user can upload the template for shipments through the upload button at the shipment level.
-
Item Level: The user can upload the template for items through the upload button at the item level.
-
Custom Level: The user can upload the template for customs through the upload button at the custom level.
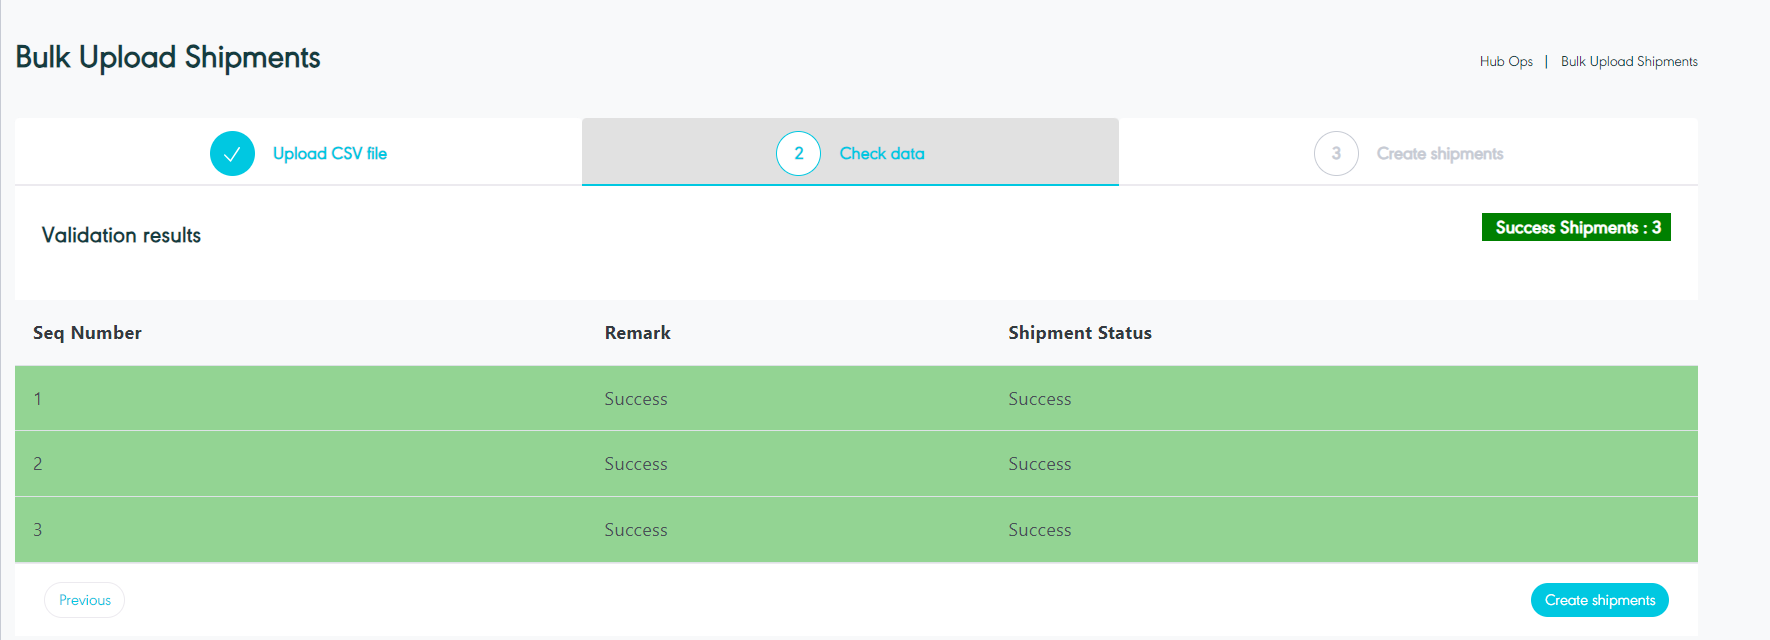
When we click 'Create Shipment', the system will create the shipment and redirect the user to the Uploaded Files page.
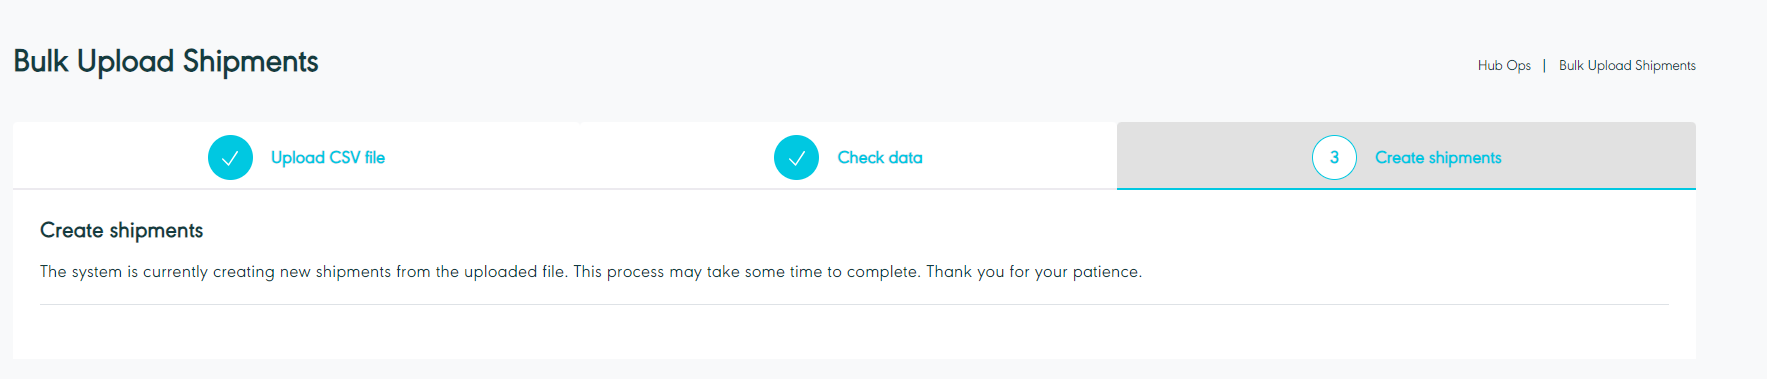
After being redirected to the 'Uploaded Files Page,' users can view all uploaded shipments.